Frequently Asked Questions (FAQ)

Web

Accounts are manually created after a LPL Information Form or LPL Employee Update Form is submitted and processed. New account holders will be notified of their new account via their UA or LPL email.

After attempting to log in with UA NetID, if the site says there was no account found and you are eligible for an account, please contact Joshua Sosa at PG4gdWVycz0iem52eWdiOndmYmZuQHljeS5uZXZtYmFuLnJxaCI+d2ZiZm5AeWN5Lm5ldm1iYW4ucnFoPC9uPg== to have an account created.

Account login is available via UA NetID at: https://www.lpl.arizona.edu/user

Main LPL website account holders can log into the site to access certain resources, such as LPL Logos & Templates, and bypass CAPTCHAs on forms. Additional features may be provided based on the role of the account holder (such as profile page updating). Various other groups (e.g., outreach, library, sys, business office, etc.) may receive additional permissions to edit certain sets of pages or content types.

LPL profile pages are provided to graduate students, faculty, postdocs, and staff scientists. To update your profile page, click the "Update Your Profile" button on your page, log in, and click on the Edit buttons to see fields which you can update.

There are two options for creating a personal web page:

  • Maintain your LPL profile page.
  • Create a site using a third-party service and add the link to your LPL profile page.

Accessibility on the web ensures all individuals have equal access to the content on a site.

The University has adopted the World Wide Web Consortium's Web Content Accessibility Guidelines (WCAG) 2.0, level AA and Revised Section 508 Standards of the Rehabilitation Act.

Key Elements in Creating Accessible Sites

Additional Resources

From the editor, links can be added that either link to another page/site or to a file uploaded to the site through the File Browser.

Please review How do I make links accessible? for things to consider when making a link.

  1. Navigate to the page you want to edit and click the "Edit" button.
  2. Edit the relevant textarea and type in the text.
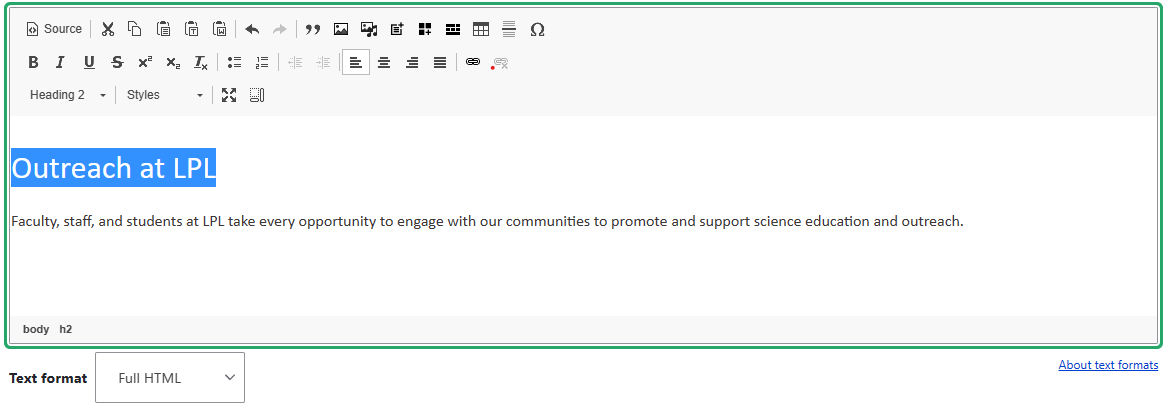
  3. Highlight the text to be linked.
    Highlight text
  4. Click the 'Link' button in the middle row of the toolbar (button shows a picture of a chain link).
    Link button
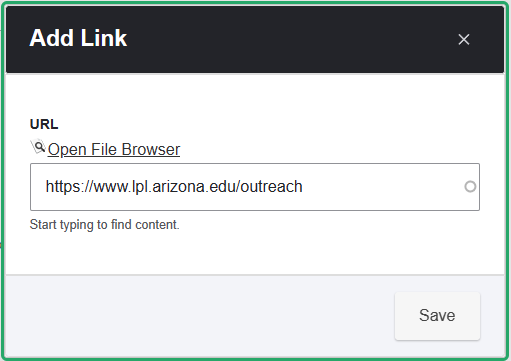
  5. Enter the link URL:
    Link dialogue
  6. Click Ok to have the link inserted into the page.
  7. Click Save.

  • Use link labels instead of full URLs. (See URLs as Links)
    Screen readers will read aloud each word in a link label as opposed to reading aloud each letter, number and symbol of a full URL.
  • Use contextually-independent link labels that are informative. (See Avoid uninformative link phrases)
    Links should be understandable without the surrounding text.
    • Example: Visit History of LPL to learn more about LPL's origins.
    • Avoid: To learn more about LPL's origins, click here.
  • Add filetypes to link labels when linking to files. (See Links to Non-HTML Resources)
    Users should be informed about non-HTML resources to set expectations.

Resources

File uploading to LPL Drupal sites is done through the IMCE File Browser.

After logging into the site:

  1. Click your name in the top-right corner.
  2. Click the "IMCE File Browser" tab.
  3. On the left pane, click "public://" and select the folder you want to upload to.
    • You may be in root on your first visit. On a subsequent visit, File browser will show only the last folder you were in. Click "public://" to reset back to the main directory.
  4. Click the Upload button above the directory list.
  5. Drag-and-drop files onto the green box or click the "+ Add file" prompt.
    • If a file already exists on the server in the current directory with the same file name, the new file will be renamed when uploaded.
  6. If the file is being uploaded from a dialog box, click Select in the File Browser toolbar or double-click the file to insert it.

File uploading to LPL Drupal sites is done through the IMCE File Browser.

After logging into the site:

  1. Paste /imce/private into your site's URL.
  2. On the left pane, click "private://" and select the folder you want to upload to.
    • You may be in root on your first visit. On a subsequent visit, File browser will show only the last folder you were in. Click "private://" to reset back to the main directory.
  3. Click the Upload button above the directory list.
  4. Drag-and-drop files onto the green box or click the "+ Add file" prompt.
    • If a file already exists on the server in the current directory with the same file name, the new file will be renamed when uploaded.
  5. If the file is being uploaded from a dialog box, click Select in the File Browser toolbar or double-click the file to insert it.

When adding a restricted URL link:

  • In the private IMCE browser, select the file and copy the URL in the bottom panel or double-click the file to open in a new tab and copy the address bar URL.

Note: Your site must be set up to handle restricted files. Contact Joshua Sosa (PG4gdWVycz0iem52eWdiOndmYmZuQHljeS5uZXZtYmFuLnJxaCI+d2ZiZm5AeWN5Lm5ldm1iYW4ucnFoPC9uPg==) to set up the restricted file system.

Text on a page should provide the same information imparted by an image on a page.

  • Add alt text to images.
    Screen readers can't 'read' an image. Alt text helps add that information.
  • Keep alt text short and descriptive.
    Alt text should not contain a paragraph.
  • Use plain text on a page instead of text embedded in an image.
    Where possible, opt to use regular text when embedding text isn't necessary.
  • Use an empty 'alt' tag for decorative images.
    Images used for simple decoration don't need to be described.
  • Use an empty 'alt' tag for images with descriptive plain text adjacent to them.
    Images of a portrait photo of a person alongside their plain text name don't need to be described.

Resources


Get the Google Maps Embed Code

  1. Go to Google Maps and search for the address.
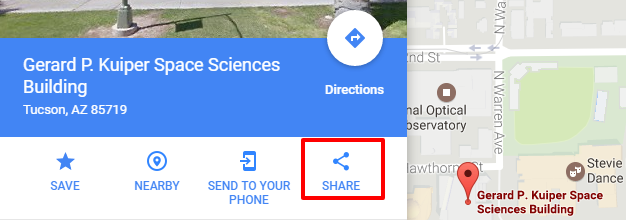
  2. After finding the location, in the details pane on the left, click the "Share" button.
    Share the Google Map
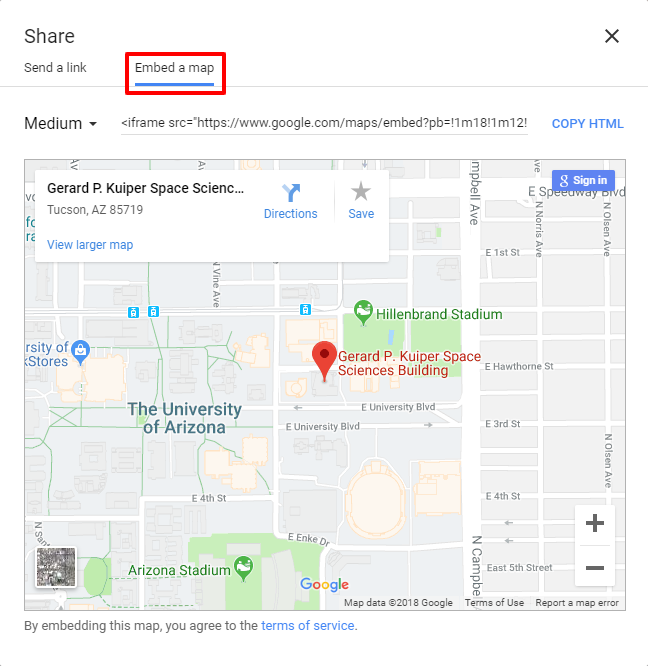
  3. Click on the "Embed a map" tab and choose the size.
    Preview the embedded map
  4. Click on the <iframe> HTML line and copy it.

Place Google Maps Embed Code into Page

  1. Navigate to the page you want to edit and click the "Edit" button.
  2. Under the relevant textaera, ensure the Text format is either Full HTML or HTML.
    Select appropriate text format
  3. If using Full HTML, click the "Source" button to view the textarea's HTML.
    Source button
  4. Paste the embed code in the HTML where needed.
    Paste embed code into source
    • Optionally, edit the iframe's width and height attributes as needed.
    • Example: To make the map span across its available content space, set the iframe width to 100%.
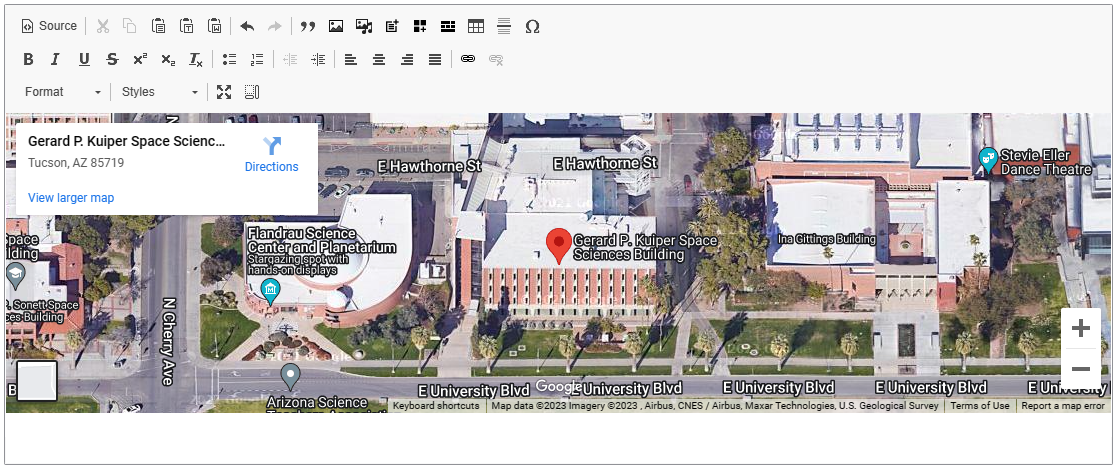
  5. Click the "Source" button again to see the embedded iframe container in the normal editing view.
    Embed is iframed
    • Optionally, double-click on the IFRAME or highlight it and select the IFrame in the top row.
    • Edit additional iframe options, such as width and height.
  6. Click Save.

Example

Images are added to a page using the page's edit mode text formatter.

  1. Navigate to the page you want to edit and click the "Edit" tab.
  2. In the relevant textarea, place your cursor where you want the image to show.
  3. Click the 'Image' button in the top row of the toolbar (button shows a picture of mountains and a sun).
    Image button in editor
  4. Enter the image URL:
  5. Optionally use the Image button with music icon instead to "embed media."
  6. Click Ok to have the image inserted into the page.
  7. Click Save.

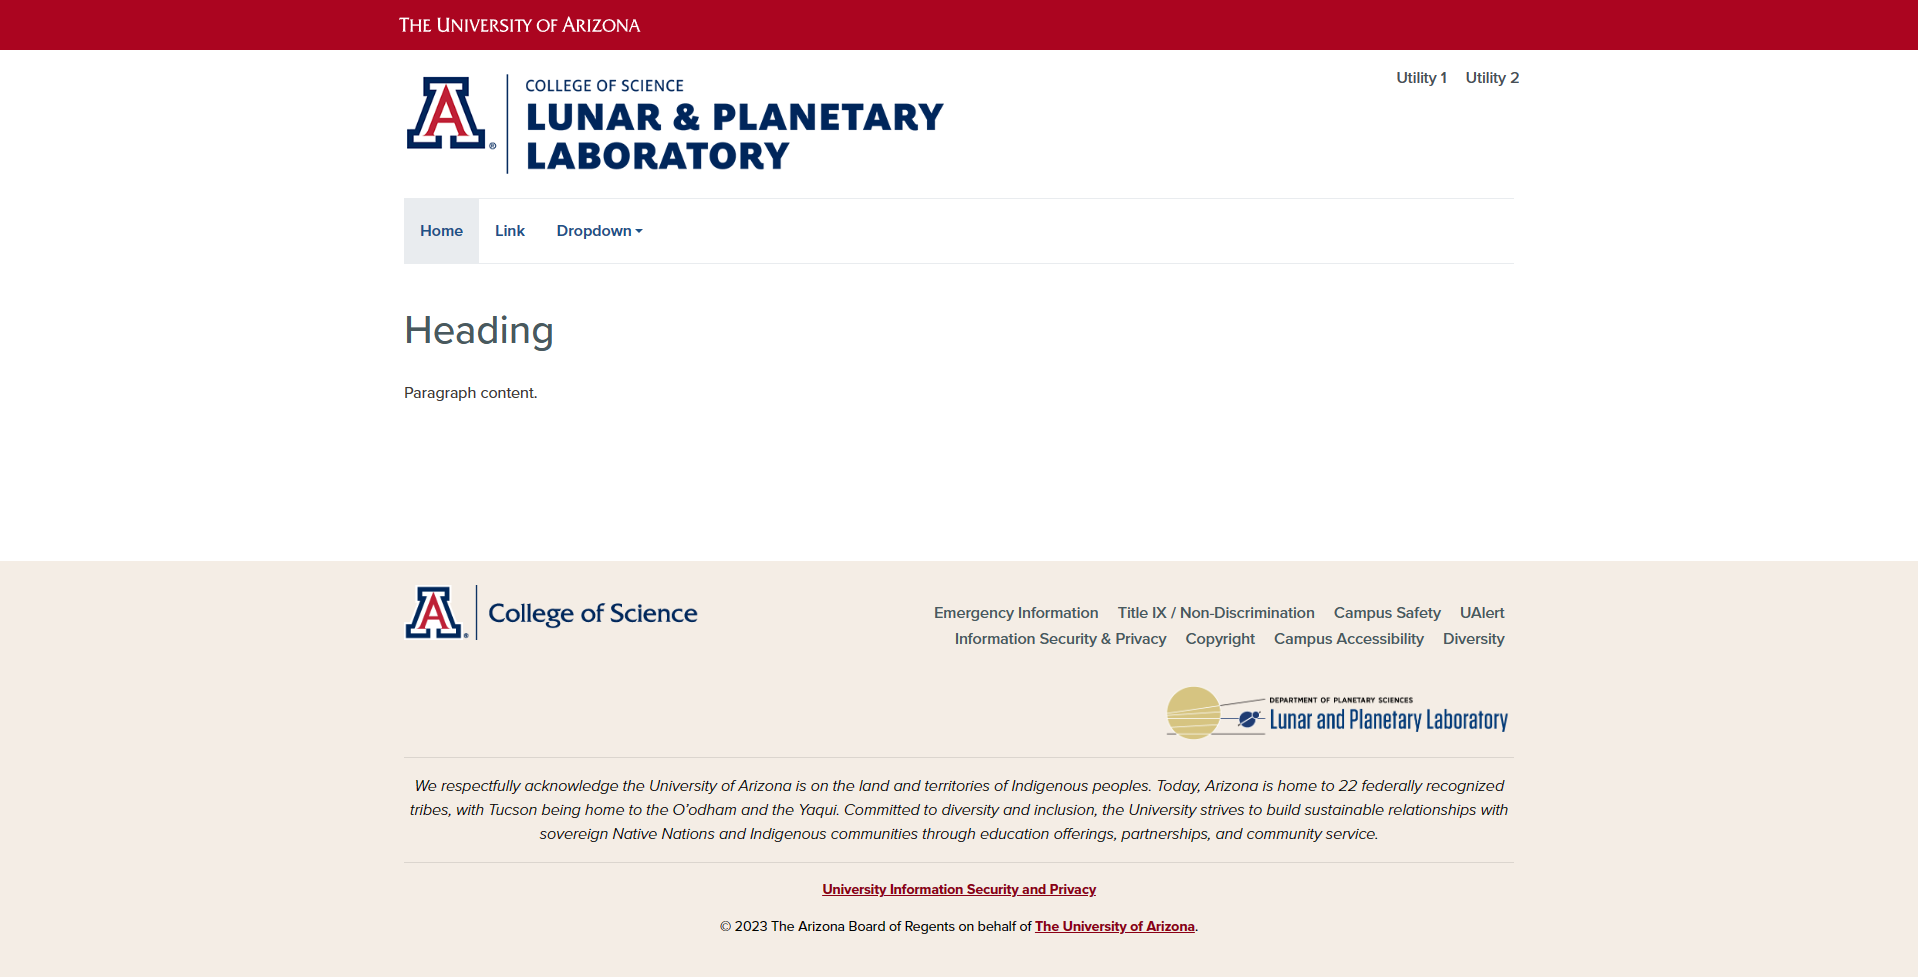
The Arizona Digital team created the Arizona Bootstrap HTML template based on the Bootstrap 4 front-end framework. AZ Bootstrap can be used for creating HTML pages with the U of A web design. All LPL Drupal sites and pages use the AZ Barrio theme to automatically apply the UArizona web design.

The LPL-themed version of the AZ Bootstrap template is available here for download which can be edited with your favorite code editor.

AZ Bootstrap screenshot

Download az-bootstrap.html (8 KB)

The LPL Calendar provides an iCal option to subscribe to the event list in your own calendar program.

On the LPL Calendar page, at the bottom of the event list, the iCal icon gives a link to the web calendar:
webcal://www.lpl.arizona.edu/calendar/ical.ics

Visit the LPL Internal Calendar page for an internal iCal subscription option.

See the following help articles to subscribe to the web calendar in a calendar program.

Google Calendar

Use a link to add a public calendar:

  1. On your computer, open Google Calendar.
  2. On the left, next to "Other calendars," click Add Add other calendars and then From URL.
  3. Enter the calendar's address: webcal://www.lpl.arizona.edu/calendar/ical.ics
  4. Click Add calendar. The calendar appears on the left, under "Other calendars."

Tip: It might take up to 24 hours for changes to show in your Google Calendar.

Windows Outlook Calendar

Add internet calendars:

  1. Open your Outlook calendar, and on the Home tab, select Add Calendar > From Internet.
  2. Paste the URL from your internet calendar and select OK: webcal://www.lpl.arizona.edu/calendar/ical.ics
  3. Outlook asks if you would like to add this calendar and subscribe to updates. Select Yes.
    • Ignore the error saying "Sorry, something went wrong." 
  4. Under My Calendars or Shared Calendars, checkmark to enable the LPL Calendar.

Tip: It might take up to 24 hours for changes to show in your Outlook calendar.

Mac Calendar

Subscribe to calendars on Mac:

  1. In the Calendar app on your Mac, choose File > New Calendar Subscription.
  2. Enter the calendar’s web address, then click Subscribe: webcal://www.lpl.arizona.edu/calendar/ical.ics
  3. Enter a name for the calendar in the Name field, then click the adjacent pop-up menu and choose a color.
  4. Click the Location pop-up menu, then choose an account for the subscription.
    • If you choose your iCloud account, the calendar is available on all your computers and devices that are set up with iCloud.
    • If you choose On My Mac, the calendar is saved on your computer.
  5. To get the calendar’s event attachments or alerts, deselect the appropriate Remove checkboxes.
  6. Click the Auto-refresh pop-up menu, then choose how often to update the calendar.
  7. To prevent alerts from appearing for this calendar, select “Ignore alerts.”
  8. Click OK.

Tip: It might take up to 24 hours for changes to show in your Mac Calendar.